Description
Have you ever wanted to transmit Arduino data over the internet?
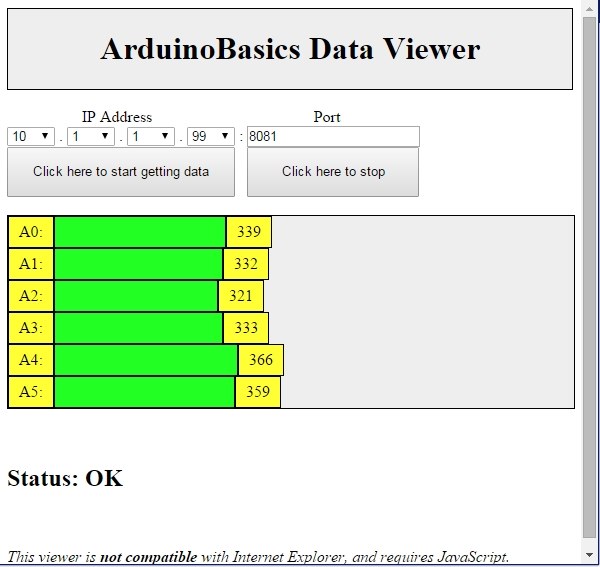
In this tutorial, we will design a web page that will retrieve Analog readings from the Arduino's Analog Pins and display them on a bar chart within the web page.
The web page will use jQuery and AJAX to request the data from the Arduino Web Server, allowing us to update the bar chart dynamically, without having to refresh the entire web page. The Arduino Web Server will send the Analog readings to the web page in JSON format where it will be processed and displayed accordingly.
In this tutorial, I will not have anything connected to the Arduino's Analog pins, which means the data retrieved will be that of randomly floating analog pins. Feel free to connect a potentiometer, temperature sensor or any other analog sensor to these pins if you want to create a more "useful" project.
The main aim here was to show you how to transmit the data in JSON format, and to update only a portion of the web page using asynchronous communication (using AJAX), to improve the performance of data retrieval and visualisation.
Parts Required:
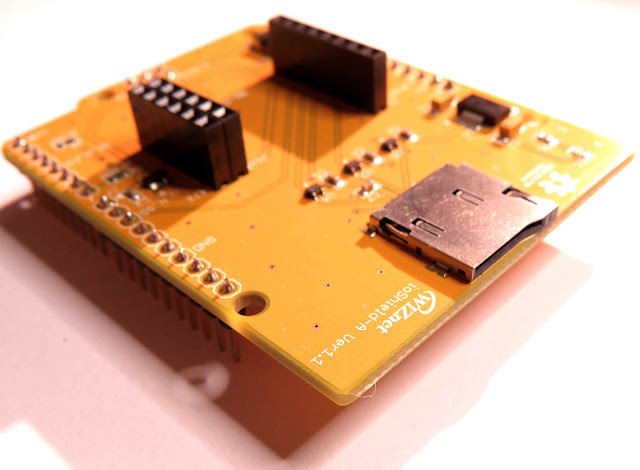
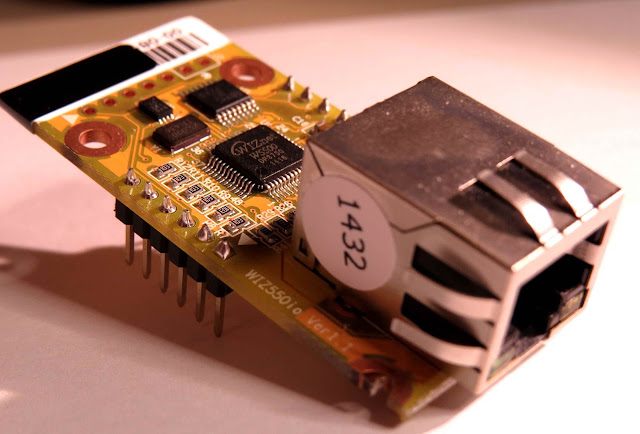
Please note: The WIZnet ioShield-A ver1.1 actually comes with the WIZ550io board. So if you buy the ioShield-A, you will receive both boards. I have provided the link to the WIZ550io shield because you can buy that shield on its own. Regardless, you will need to use both boards for this tutorial.
Arduino Libraries and IDE
To program the Arduino you will need to download the Arduino IDE, and install the WIZnet Ethernet Library. The Arduino IDE version used in this tutorial was version 1.6.4.
You may want to read the WIZnet wiki information for each WIZnet shield before use.
- Arduino IDE
- WIZnet Ethernet Library
- ioShield-A setup instructions
- WIZnet Wiki page - for more information about the ioShield-A and the WIZ550io shield
ARDUINO CODE:
/* ================================================================================================================================================== | |
Project: ArduinoBasics Web Data Server | |
Author: Scott C | |
Created: 15th Nov 2015 | |
Arduino IDE: 1.6.4 | |
Website: http://arduinobasics.blogspot.com/p/arduino-basics-projects-page.html | |
Description: This Arduino sketch will set up a simple web data server which will send Analog Pin readings | |
to any web browser that connects to it. It will send the data in JSON format. | |
Some sections code are borrowed from elsewhere - including: | |
- the WIZnet Ethernet library "WebServer" example sketch - https://github.com/Wiznet/WIZ_Ethernet_Library | |
- authors: David A.Mellis and Tom Igoe | |
- the idea to use PORT 8081 was taken from this page: http://www.makeuseof.com/tag/give-your-arduino-project-its-own-mini-webserver-with-an-ethernet-shield/ | |
- author: James Bruce | |
- and this forum post by Mario Cordeiro - helped to get me on the right track with the JSON response to the Web Browser. | |
http://arduino.stackexchange.com/questions/11696/get-json-data-from-arduino-with-ajax | |
Pin Availability: Wiznet ioShield-A - connects to pins D2, D4, D7, D10, GND, | |
and IOREF, RESET, 5V, GND, GND | |
Note: Arduino Ethernet shield attached to pins 10, 11, 12, 13 - Arduino Ethernet shield | |
Analog pins A0, A1, A2, A3, A4 and A5 are available when using the ioShield-A or the Arduino Ethernet Shield. | |
===================================================================================================================================================== */ | |
#include <SPI.h> //Include these libraries | |
#include <Ethernet.h> //Make sure to modify the 5100.h file to suit the Ethernet chip on your shield (eg. W5500) as per the gitHub instructions: https://github.com/Wiznet/WIZ_Ethernet_Library | |
byte mac[] = {0x00, 0x08, 0xDC, 0x1C, 0xB8, 0x4C}; //Enter the MAC address that is on your Ethernet shield (sticker) - eg. 00-08-DC-1C-B8-4C (but use hexidecimal format eg. 0x00) | |
IPAddress ip(10, 1, 1, 99); //The IP address that you will give the Server - will depend on your local network range | |
EthernetServer server(8081); //The port to listen for Web Browsers - the default is 80, but some routers will block this port.. so change to 8081. | |
//************************************************************************************************* | |
// setup function | |
//================================================================================================= | |
void setup() { | |
Serial.begin(9600); //Begin Serial communication (baud rate = 9600). | |
Ethernet.begin(mac, ip); //Initialise the ethernet library and network settings: https://www.arduino.cc/en/Reference/EthernetBegin | |
server.begin(); //Tell the server to begin listening for incoming connections (on port 8081 in this example) | |
Serial.print("Server IP address : "); | |
Serial.println(Ethernet.localIP()); //If you see the IP address within the Serial monitor - you know that the server started successfully | |
} | |
//************************************************************************************************* | |
// loop function | |
//================================================================================================= | |
void loop() { | |
EthernetClient client = server.available(); // assign any newly connected Web Browsers to the "client" variable. | |
if(client.connected()){ | |
Serial.println("Client Connected"); | |
while(client.available()){ | |
//Serial.write(client.read()); // Uncomment if you want to write the request from the Browser (CLIENT) to the SERIAL MONITOR (and comment out the next line) | |
client.read(); // This line will clear the communication buffer between the client and the server. | |
} | |
//Send the Server response header back to the browser. | |
client.println("HTTP/1.1 200 OK"); // This tells the browser that the request to provide data was accepted | |
client.println("Access-Control-Allow-Origin: *"); //Tells the browser it has accepted its request for data from a different domain (origin). | |
client.println("Content-Type: application/json;charset=utf-8"); //Lets the browser know that the data will be in a JSON format | |
client.println("Server: Arduino"); // The data is coming from an Arduino Web Server (this line can be omitted) | |
client.println("Connection: close"); // Will close the connection at the end of data transmission. | |
client.println(); // You need to include this blank line - it tells the browser that it has reached the end of the Server reponse header. | |
//Transmit the Analog Readings to the Web Browser in JSON format | |
//Example Transmission: [{"key":0, "value":300},{"key":1, "value":320},{"key":2, "value":143},{"key":3, "value":24},{"key":4, "value":760},{"key":5, "value":470}] | |
client.print("["); // This is tha starting bracket of the JSON data | |
for(int i=0; i<6; i++){ // Transmit analog readings from Analog Pin 0 to Analog Pin 5 | |
client.print("{\"key\": "); | |
client.print(i); // The key for Analog pin 0 (A0) is equal to 0 eg. "key":0 | |
client.print(", \"value\": "); | |
client.print(analogRead(i)); // The value is equal to the Analog reading from that pin. eg. "value":300 | |
if(i==5){ | |
client.print("}"); // The last value will end with a bracket (without a comma) | |
} else { | |
client.print("},"); // All other values will have a comma after the bracket. | |
} | |
} | |
client.println("]"); // This is the final bracket of the JSON data | |
client.stop(); // This method terminates the connection to the client | |
Serial.println("Client has closed"); // Print the message to the Serial monitor to indicate that the client connection has closed. | |
} | |
} | |
Full description of the Arduino code is included in the YouTube video above. Once you have set up your Arduino Web Server, you should be able to ping it. Look at this website, if you don't know how to use the windows ping feature.
Getting the Arduino Board onto the internet:
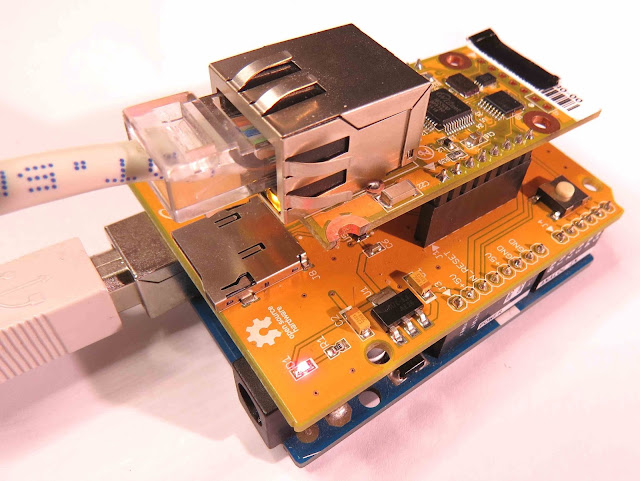
There isn't anything really to hook up for this project. You just have to align the pins for each board and stack them. You can power the Arduino via the USB cable. This will also be useful for debugging and printing to the Serial monitor. An ethernet cable needs to connect the WIZ550io board's ethernet port to your internet/network router
- The WIZ550io board goes on the top
- The ioShield-A is in the middle
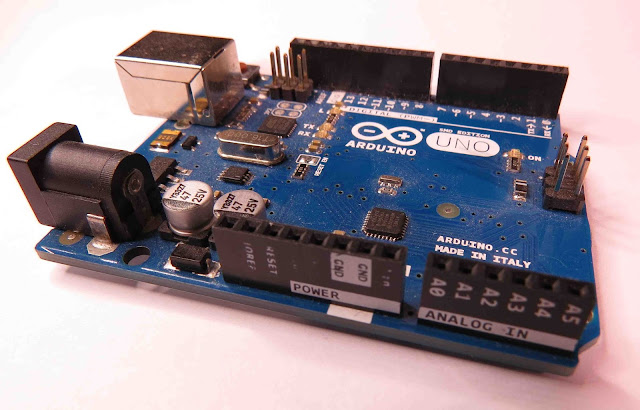
- The Arduino UNO is on the bottom
- This is what it looks like when they are stacked together
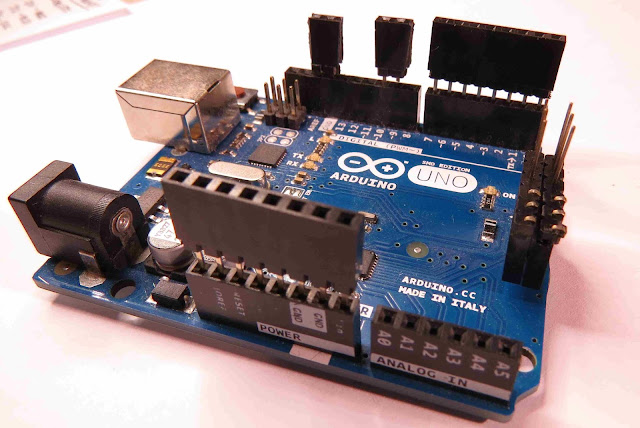
- If you want to gain easy access to the Analog or digital pins without de-soldering the ioShield-A, you can introduce some female headers like this:
- Please note that the ioShield-A utilises a number of pins on the Arduino UNO - including: D2, D4, D7, D10, GND, and IOREF, RESET, 5V, GND, GND and ICSP pins
- All Analog pins are available for use
Set the Arduino Web Server on your local network
You can test this project on your local network. You just have to choose an available IP address and PORT within your router's IP range. If you don't know your local IP address range - you can have a look at this site to give you a helping hand.
Set the Arduino Web Server to be accessed from anywhere in the world
If you want to access your Arduino from anywhere in the world, you need to set up Port Forwarding on your internet network router. The following useful guides will hopefully get you on the right track, if you have never set up Port forwarding.
- What is Port Forwarding
- portforward.com
- Example of how to port forward on the iiNet BOB2 router
- PC World instructions on how to port forward
- YouTube video on how to set up port forwarding
In my case, I programmed the Arduino UNO Web Server to take the following ip address on my internal network: 10.1.1.99
I programmed the Arduino Web Server to listen for Web Browsers on port 8081.
So if I wanted to connect to the Arduino Web Server through my home network, I just had to type in this web address into my web browser: http://10.1.1.99:8081
If you plan to connect to the Arduino using port 80 (which is the default port for web browsers), you can just type the IP address without specifying the port (eg. http://10.1.1.99/ )
The web browser should display the Arduino data in JSON format (the YouTube video above will show you what that looks like).
Once I knew I could connect to the Arduino in my internal network, I then set up port forwarding on my router so that I could type in my external IP address and special port to tunnel my way into my Arduino Web Server on my internal network. This is what I had to do on my router, but you may need to do something different.
- My first step was to find out my public/external IP address by typing "what is my IP address" into google. If you want to know your external IP address click here.
- I then typed my router's ip address into a web browser, and logged into my router.
- I went to the advanced settings tab
- Selected "Port Forwarding" from the side menu
- Filled out all of the details on the first line of the Ports list
- Enable box = ticked
- Description = Arduino
- WAN interface = pppoe_atm0/ppp0
- Inbound port = 8082
- Type = TCP
- Private IP address = 10.1.1.99
- Private port = 8081
- Saved the settings
Now that I had port forwarding enabled, I could type the ip address (that I obtained in step 1) into my browser and specified port 8082 (instead of 8081) - eg. http://190.11.70.253:8082/
And now I can access my Arduino Web server from anywhere in the world. I can even access it from my smart phone. Once again, this will only return the Analog data in JSON format.
The Web Page GUI
The Arduino is now on the internet, so there are two options. You can either
- go to this web page: ArduinoBasics Webserver Data Viewer
- or create the web page yourself (with a little help from the HTML code below)
Instructions on how to use these web pages, are listed below the HTML code.
<!DOCTYPE HTML PUBLIC "-//W3C//DTD HTML 4.01 Transitional//EN" "http://www.w3.org/TR/html4/loose.dtd"> | |
<html> | |
<head> | |
<meta http-equiv="Content-Type" content="text/html; charset=utf-8" /> | |
<title>ArduinoBasics WebServer Data Viewer</title> | |
<script src="https://ajax.googleapis.com/ajax/libs/jquery/2.1.3/jquery.min.js"></script> | |
</head> | |
<body> | |
<style> | |
.table{ | |
width: 100%; | |
background: #eeeeee; | |
line-height: 32px; | |
border: 1px solid black; | |
} | |
.bars { | |
float: left; | |
height: 30px; | |
line-height: 30px; | |
border: 1px solid black; | |
padding-left: 10px; | |
padding-right: 10px; | |
background: #FFFF33; | |
color: #000000; | |
} | |
.row{ | |
width: 100%; | |
clear: both; | |
} | |
</style> | |
<div align="center" style="background: #eeeeee; border: 1px solid black;"> | |
<h1>ArduinoBasics Data Viewer</h1> | |
</div> | |
<br> | |
<div id="IP Address" style="width: 220px; float:left" align="center">IP Address</div><div id="Port Num" style="width: 200px; float:left;" align="center">Port</div><br> | |
<select id="Addr0"></select> . | |
<select id="Addr1"></select> . | |
<select id="Addr2"></select> . | |
<select id="Addr3"></select> : | |
<input id="port" value='8081' /><br> | |
<button type="button" id="startData" style="height: 50px; width: 228px">Click here to start getting data</button> | |
<button type="button" id="stopData" style="height: 50px; width: 172px">Click here to stop </button><br> | |
<br> | |
<div class="table"> | |
<div class="row"><div class="bars">A0: </div><div class="bars" id="Analog0"></div><div class="bars" id="A0">0</div></div><br> | |
<div class="row"><div class="bars">A1: </div><div class="bars" id="Analog1"></div><div class="bars" id="A1">0</div></div><br> | |
<div class="row"><div class="bars">A2: </div><div class="bars" id="Analog2"></div><div class="bars" id="A2">0</div></div><br> | |
<div class="row"><div class="bars">A3: </div><div class="bars" id="Analog3"></div><div class="bars" id="A3">0</div></div><br> | |
<div class="row"><div class="bars">A4: </div><div class="bars" id="Analog4"></div><div class="bars" id="A4">0</div></div><br> | |
<div class="row"><div class="bars">A5: </div><div class="bars" id="Analog5"></div><div class="bars" id="A5">0</div></div><br> | |
</div> | |
<br> | |
<div id="FailureStatus"><H2>Status:</H2></div> | |
<br> | |
<div id="statusDiv"><i>This viewer is <b>not compatible</b> with Internet Explorer, and requires JavaScript.</i></div> | |
<script> | |
<!--This is the jQuery script which will connect to the Arduino --> | |
var timeOut; //This variable is responsible for the frequency of data acquisition | |
$(document).ready(function(){ | |
//Populate the options for the IP address drop-down boxes. | |
for(j=0; j<256; j++){ | |
for(i=0; i<4; i++){ | |
$('#Addr'+i) | |
.append($("<option></option>") | |
.attr("value",j) | |
.text(j)); | |
} | |
} | |
//Set the default IP address in the drop down boxes. | |
$('#Addr0').val('10'); | |
$('#Addr1').val('1'); | |
$('#Addr2').val('1'); | |
$('#Addr3').val('99'); | |
}); | |
//When the start button is clicked - get the data from the Arduino | |
$("#startData").click(function(){ | |
$(document).ready(function(){ | |
getMyData(); //get data once the document is ready | |
}); | |
}); | |
//Stop collecting data when the stop button is clicked. | |
$("#stopData").click(function(){ | |
clearTimeout(timeOut); //This clears any future requests for data (until the Start button is pressed again) | |
}); | |
function getMyData(){ | |
//get the IP address from the drop-down boxes | |
var x0 = $('#Addr0 option:selected').text(); | |
var x1 = $('#Addr1 option:selected').text(); | |
var x2 = $('#Addr2 option:selected').text(); | |
var x3 = $('#Addr3 option:selected').text(); | |
//get the port number from the text box | |
var x4 = $('#port').val(); | |
//Construct the URL of the Arduino Server we plan to connect to | |
var myUrl = 'http://' + x0 + "." + x1 + "." + x2 + "." + x3 + ":" + x4 + "/"; | |
var myData = $.ajax({ | |
url: myUrl, // eg. http://10.1.1.99:8081/ | |
data: { tag: 'GetDataFromArduino'}, | |
dataType : "json", //We will be requesting data in JSON format | |
timeout : 10000, //this will cancel the request if it has not received a reply within 10 seconds. | |
success: function(data){ | |
console.log('Success - you are a legend'); | |
$("#FailureStatus").html("<H2>Status: OK</H2>"); //clear any failure messages. | |
$.each(data, function(index, element) { | |
if(element.value<100){ | |
console.log('Low'); | |
$('#Analog' + element.key).css({'background-color':'#FF1128'}); | |
} else { | |
$('#Analog' + element.key).css({'background-color':'#22FF22'}); | |
} | |
$('#A'+element.key).html("<span>" + element.value + "</span>"); | |
$('#Analog' + element.key).animate({width: ((element.value/1023)*80)+"%"}); | |
}); | |
}}); | |
myData.error(function(xhr, status, errorThrown){ | |
$("#FailureStatus").html("<span><H2>Status:FAILED to get DATA !! </H2></SPAN>"); | |
console.log('Failure'); | |
console.log("Error: " + errorThrown); | |
console.log("Status: " + status); | |
console.dir(xhr); | |
}); | |
timeOut = setTimeout('getMyData()', 1000); //this will request data again in 1 second. | |
} | |
</script> | |
</body> | |
</html> |
To retrieve data from your Arduino Web Server, please make sure that it is connected and visible from outside of you local network. You will need to have port forwarding enabled. Information on port forwarding is described above.
- Find what your external IP address is.
- Enter this address using the IP address drop-down boxes within the "ArduinoBasics Webserver Data viewer" web page
- Enter the port forwarding port number (eg. 8082) into the box labelled "Port"
- Then click on the "Click here to start getting data" button - you should start to see the bar charts moving and status should be OK
- If the bar charts do not move, and the status message says "Failed to get DATA!!" - then the web page was unable to connect to the Arduino for some reason.
Troubleshooting
- You may want to type in the web address into your web browser, to make sure that data is being retrieved.
- You can also open the Serial monitor in the Arduino IDE to make sure that an IP address is being displayed
- Ensure that you have enabled the port forwarding option on your router
- Have a look at Developer Tools within Google Chrome to help diagnose web page related issues.
- The web page will not work properly if you use Internet Explorer or if you have javascript disabled within your browser.
Concluding comments
This tutorial showed you how to connect to your Arduino UNO over the internet, and retrieve data in JSON format using jQuery and AJAX. The web page can be modified to suit your own needs, plus it would be more useful if the Arduino was actually monitoring something, rather than logging data from floating pins. It would also be useful if the Arduino could be controlled to blink an LED, or to turn a motor... but I will leave that project for another day. I hope you enjoyed this tutorial - if it helped you in any way, please consider donating a small "tip" into my money jar. Thank you.
If you like this page, please do me a favour and show your appreciation :
Visit my ArduinoBasics Google + page.
Follow me on Twitter by looking for ScottC @ArduinoBasics.
I can also be found on Pinterest and Instagram.
Have a look at my videos on my YouTube channel.
This project would not have been possible without WIZnet's collaborative effort.
Please visit their site for more cool Ethernet products.
Description: Get Arduino Data over the internet using jQuery and AJAX Rating: 3.5 Reviewer: Unknown ItemReviewed: Get Arduino Data over the internet using jQuery and AJAX
0 comments:
Post a Comment