PART FOUR
Parts 1-3 of the tutorial were designed to take you step-by-step through designing the app. If you are wondering what you missed, here is a summary:
This is what you'll find in partone:
This is what you will find in part two:
This is what you will find in part three:

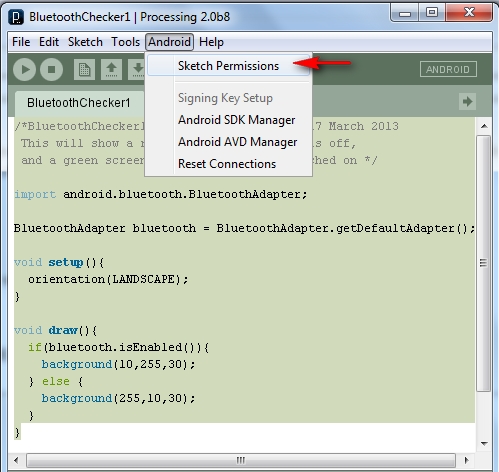
Make sure that you have selected the Bluetooth permissions as per the following:

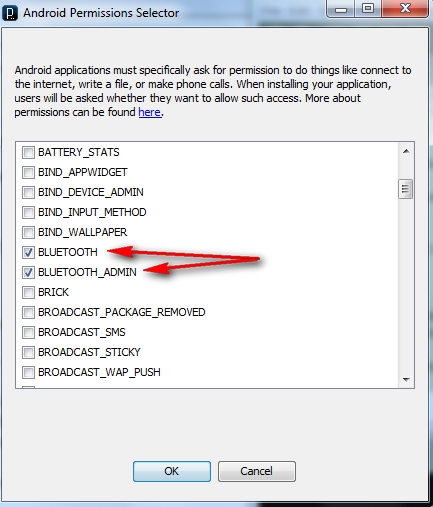
Make sure that BLUETOOTH and BLUETOOTH_ADMIN are selected (as per the picture below). Then press the OK button.

Then copy and paste the following sketch into the processing/android IDE:
Android/Processing Sketch 9: Bluetooth App2

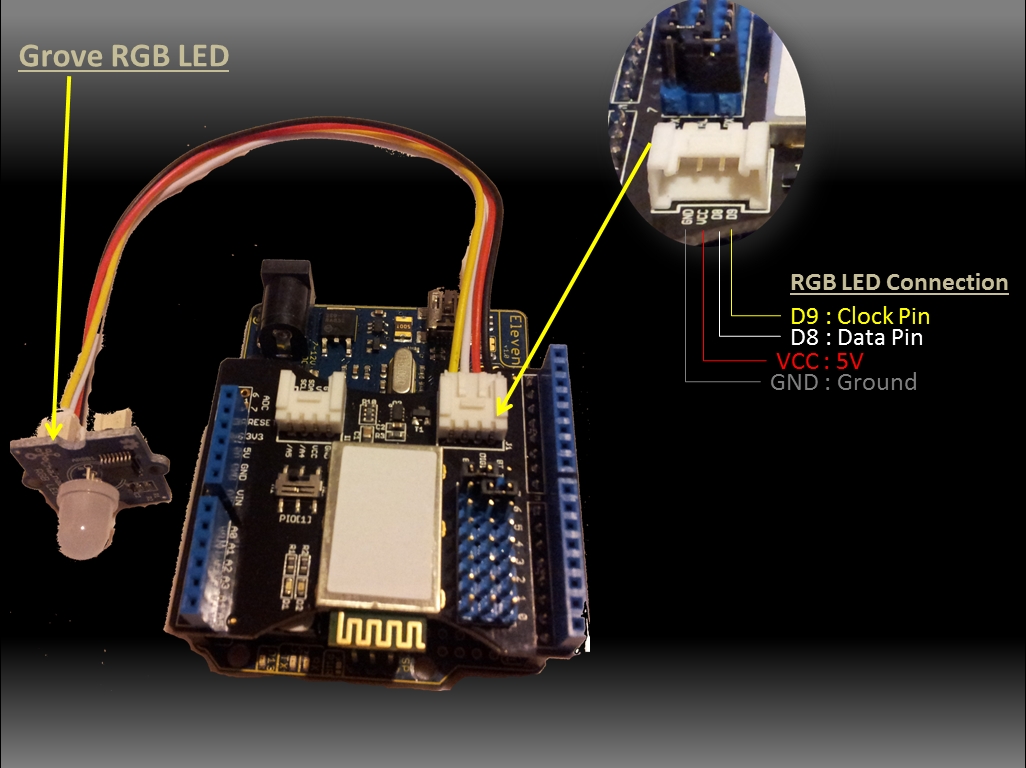
Here is a picture of the components used in this sketch:


Arduino Sketch 3: Bluetooth RGB Colour Changer (with OFF option)
Please note that this Arduino code/project will work with SeeedStudio's Bluetooth Shield. You may need to modify the Arduino Code (lines 95-107) to coincide with your own bluetooth shield. I got the code snippet within the my setupBlueToothConnection() method from some example code from Steve Chang which was found on SeeedStudio's Bluetooth Shield Wiki page. Here is some other useful information in relation to setting up this Bluetooth Shield that could be of help in your project (here).
Much of the code used within the Android/Processing sketch was made possible through constant reference to these sites:
And I would also like to thank Pauline303 who made the suggestion within the Processing Forums to use APWidgets Library for my Buttons in the App.
The Arduino and Processing Forums are always a great place to get help in a short amount of time.

Description: Bluetooth Android Processing 4
Rating: 3.5
Reviewer: Unknown
ItemReviewed: Bluetooth Android Processing 4
The Video

This is part 4 of my tutorial on designing an Android Phone Bluetooth App using the Android/Processing language. The App sends information to an Arduino via Bluetooth after pressing a button on the phone. The RGB LED attached to the Arduino Uno (or compatible board) will change colour depending on the button being pressed on the phone. The Arduino gains Bluetooth capabilities through the Seeedstudio Bluetooth shield (which can be found here).
This is part 4 of my tutorial on designing an Android Phone Bluetooth App using the Android/Processing language. The App sends information to an Arduino via Bluetooth after pressing a button on the phone. The RGB LED attached to the Arduino Uno (or compatible board) will change colour depending on the button being pressed on the phone. The Arduino gains Bluetooth capabilities through the Seeedstudio Bluetooth shield (which can be found here).
Parts 1-3 of the tutorial were designed to take you step-by-step through designing the app. If you are wondering what you missed, here is a summary:
This is what you'll find in partone:
- Downloading and setting up the Android SDK
- Downloading the Processing IDE
- Setting up and preparing the Android device
- Running through a couple of Processing/Android sketches on an Andoid phone.
This is what you will find in part two:
- Introducing Toasts (display messages)
- Looking out for BluetoothDevices using BroadcastReceivers
- Getting useful information from a discovered Bluetooth device
- Connecting to a Bluetooth Device
- An Arduino Bluetooth Sketch that can be used in this tutorial
This is what you will find in part three:
- InputStreams and OutputStreams
- Error Logs using logcat
- Testing the InputStreams and OutputStreams
- Using the APWidgets library to create buttons
- Adding Buttons to the BlueTooth Project
In Part 4, we simplify and strip down the App so that it will only sends a specific String to the Arduino via Bluetooth. The String sent to the Arduino depends on the Button being pressed. The code has been cleaned up and has many comments to help you understand what is going on. You should be able to run this sketch without having to go back through parts one, two or three of the tutorial. This fourth part of the tutorial was designed for those people who want the final end product, and are happy to work it out for themselves. I hope this serves you well.
I will therefore assume that you have already setup your phone and have downloaded all the neccesary drivers, libraries, SDKs and IDEs. If not, then here are a few quick links:
If you are a bit lost and want want a bit more information then please go through parts one, two and three of this tutorial.I will therefore assume that you have already setup your phone and have downloaded all the neccesary drivers, libraries, SDKs and IDEs. If not, then here are a few quick links:
Make sure that you have selected the Bluetooth permissions as per the following:
- Android > Sketch permissions (as per the picture below)

Make sure that BLUETOOTH and BLUETOOTH_ADMIN are selected (as per the picture below). Then press the OK button.

Then copy and paste the following sketch into the processing/android IDE:
Android/Processing Sketch 9: Bluetooth App2
1 | /* BluetoothApp2: Written by ScottC on 1st April 2013 using |
Here is a picture of the components used in this sketch:
- Arduino (Freetronics ELEVEN) with the
- Bluetooth Shield in place, and a
- Grove RGB chainable LED
- attached using Grove Universal 4pin cable.

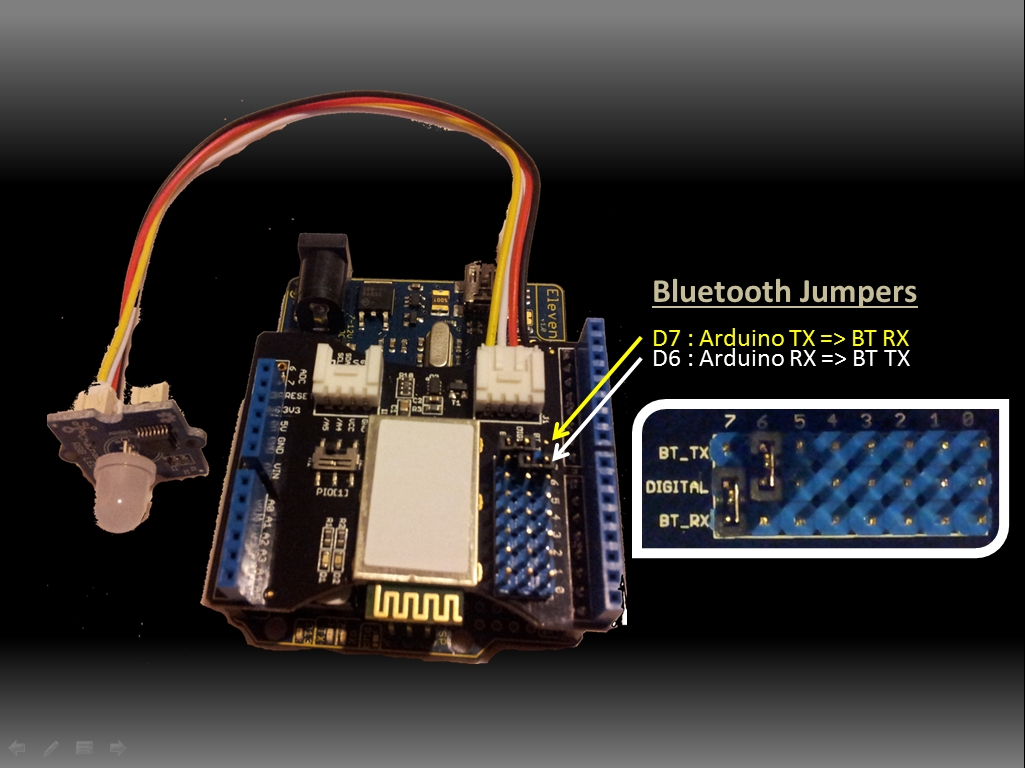
Please take notice of the Jumper pin placement on the Bluetooth Shield. This ensures communication between the Arduino and Bluetooth Shield, and is reflected in the Arduino code further down this page. The Arduino transmits information to the Bluetooth Shield on Digital pin 7, and therefore the Bluetooth Shield receivesinformation from the Arduino on Digital pin 7. On the other hand, the Bluetooth shield transmits and the Arduino receives information on Digital pin 6 (see picture below). This serial communication between the Arduino and the Bluetooth Shield occurs through the SoftwareSeriallibrary. This is different from the Serial library used in some of my other tutorials (often to display information in the Serial Monitor). The Arduino UNO's Serial pins are 0 (RX) and 1 (TX). It is worth looking at the Arduino Serialpage if you happen to have an Arduino Leonardo, because there are some differences that you should take into consideration when running this sketch.

Make sure that your Arduino has the following code installed and running BEFORE you launch the Android/Processing Sketch on your Android Device. If you don't do it in this order, your Android phone will not discover the Bluetooth Device attached to the Arduino, and you will waste a lot of time. Make sure that the Bluetooth shield is flashing it's red/green LEDs. Once you see this alternating red/green LED display, launch the Android/Processing sketch on the Android device. When you see the chainable RGB LED turn from white to green, you know you have a successful connection. You may then press the GUI buttons on the Android phone to change the colour of the LED to either Red, Green, Blue or Off.
Arduino Sketch 3: Bluetooth RGB Colour Changer (with OFF option)
2 | /* This project combines the code from a few different sources. |
Please note that this Arduino code/project will work with SeeedStudio's Bluetooth Shield. You may need to modify the Arduino Code (lines 95-107) to coincide with your own bluetooth shield. I got the code snippet within the my setupBlueToothConnection() method from some example code from Steve Chang which was found on SeeedStudio's Bluetooth Shield Wiki page. Here is some other useful information in relation to setting up this Bluetooth Shield that could be of help in your project (here).
Much of the code used within the Android/Processing sketch was made possible through constant reference to these sites:
And I would also like to thank Pauline303 who made the suggestion within the Processing Forums to use APWidgets Library for my Buttons in the App.
The Arduino and Processing Forums are always a great place to get help in a short amount of time.
